

This tutorial is no longer available. Other beautiful crepe paper d.i.y. projects can be found at the links below.
February 2014 EGG + CREPE PAPER VALENTINE'S DAY HEARTS
November 2013 CREPE PAPER WOODLAND ORNAMENTS
December 2013 MOCK-VINTAGE FLORAL BULB REFLECTORS


Indeed a 'magnus opum" my oh my!! They are a work of art, please don't feel with candy and whack, that would be so sad ;(
ReplyDeleteThey look really spectacular together!
Thank you, Giova! I have been going nuts trying to finish them up and photograph them. The weather held me back for a week!
DeleteI don't really think I'd ever hit one, but let's see if I get tired of them taking up space in our apartment. In a few months I might be ready to smash them! :)
Hi Giova, hahaha.
DeleteI found the most beautiful paper flowers EVER on the internet, and who is commenting? Giova!!! :-D
Dear TIFFANIE, the flowers are gorgeous! THANKS FOR SHARING!!!!!
Sonja
www.yonkelork.de
Thank you, Sonja! Haha, you found your friend Giova here, how funny! :)
DeleteAmazing. So beautiful and very generous of you to include the tutorial. Thank you.
ReplyDeleteThank you for commenting, Chania! I was waffling about doing the tutorial because it's so darn long, but it was fun. As long as you invert the end of your paper maché balloon, that's really all you need to know!
DeleteAhhh-maze-balls
ReplyDeleteThanks, friend! xo
DeleteHeather I think you meant to say 'flowers' not balls. These are gorgeous Tiffanie! If I wasn't married I'd make these for my own wedding!
DeleteThank you! I think Heather did mean balls. Or ballz! ;)
DeleteGirl, you are amazing. And nuts. But mostly amazing! Seriously. These are SO cool. Did you know Mabel's middle name is Peony? I sense one of these in her future, when she's a little bigger and really old enough to properly appreciate it.
ReplyDeleteHave no doubt that when that time comes i'll be coming to you for a commission, not trying this crazytown stunt myself! have a lovely vacation! xo b
Hahahahaha. I am crazy. My poor family.
DeleteI had no idea about Mabel's middle name. That is awesome! My grandmother was Violet Rose. Beautiful names! Did you name her that for your love of peonies? So cute.
I will happily make one for that little bub when the time is right. Thank you, and let's get together when I get back! xo
Just stunning, Tiffanie! You are so ridiculously talented. I can't believe how real they look!!! I think I've looked at this post once every hour today, just to make me smile.
ReplyDeleteThank you so much, Kelly, and right back at you. When I am back and settled I still need to send you a little (or maybe big?) package. :)
DeleteWhere did you find the floral crepe paper rolls?
ReplyDeleteFrom the amazing Castle in the Air in Berkeley. Here's the link:
Deletehttps://www.castleintheair.biz/shoppe/?b=10&k=10&c=366
Wow, those are gorgeous!
ReplyDeleteThank you, Hanna, I appreciate your comment!
DeleteJust know your blog. Incredibly great diy! thanks for sharing!
ReplyDeleteYou're welcome! Thank you for reading!
DeleteI am IN LOVE. Peonies are my favorite! I could never break these! :)
ReplyDeleteYou are the sweetest, Emily! :)
DeleteI love peonies and these are breathtaking!!! I would make them and hang them in a room--never break it!! Absolutely stunning!
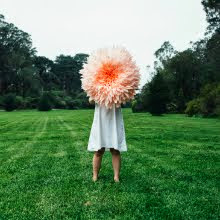
ReplyDeleteHi there! Thank you for your kind words! They are presently hanging on my walls and from my ceiling and look great as room decor. The splayed out ones remind me of African Juju hats. I'm thinking maybe I will try one that really duplicates those one day.
DeleteWould be beautiful room decorations. I couldn't possibly destroy them, they are so lovely.
ReplyDeleteThank you, Jeanne. I appreciate your comment!
DeleteHoly freaking shit, girl! These are amazing! Well done and no one will ever want to destroy them--they are way too beautiful.
ReplyDeleteI hope you are having a blast on your vacation and let's set up a time to grab drinks when you get back!
xo
Miss Dottie! Thank you so much. They are awesome wall hangings, for sure. If someone ever breaks them, I want photos!
DeleteVacation was incredible, it's too cold here in S.F.! Drink plans forthcoming! :)
These are gorgeous!! I definitely would try making them to add some bright, beautiful flowers to the dreary rainy days once September hits for my room! Thank you for this amazing DIY!
ReplyDeleteThank you, Milly!
DeleteThank you for the tutorial. I recently discovered your site and I cannot get over how talented you are. Thank you again.
ReplyDeleteWow, thank you so much, Nan! :)
DeleteOh gosh, these are the cutest summer project I've seen so far.
ReplyDeleteThanks so much, Mickey!
DeleteWOW! Those are show-stopping gorgeous! LOVE THEM! And I would love to link to your tutorial if you didn't mind.
ReplyDeleteHi Rachel. Thank you, and please share the link if you'd like!
DeleteI've made coffee filter peonies before, but these are mind-blowingly amazing!
ReplyDelete-Becca
Ladyface Blog
Coffee filter peonies sound beautiful, I will check them out. Thank you!
Deletewoh woh this is just too amazing for words! gorgeous peony pinata and awesome tutorial, too. thanks for sharing! (found you via Poppytalk!)
ReplyDeleteThank you, Lyndsay! I do like the tutorial, although it's sort of a beast! :)
DeleteI saw these on Craft and I just had to come and comment - they are stunning! I'd love to make some, but I'm not sure I'd ever be able to finish one without my cats destroying it :)
ReplyDeleteHaha! Thanks, Jessica!
DeleteOh thank you so much for the tutorial! I am online to buy crepe paper right this minute...can't wait to make a couple of these for our house! Quick question...how many rolls of paper did it take to make each flower (So I am sure to buy enough!)Thanks again!
ReplyDeleteOh, please let me know when you've made them, Rachel! There is a faint list at the top of the tutorial, but I'll just tell you: 2 rolls for the closed peony, 3 rolls for the open/bursting peonies (like the white and light pink ones above). Good luck!
DeleteThanks!!! Off to buy supplies now!
DeleteOMG i love these!
ReplyDeleteThank you, Lucy! I love your name! :)
DeleteHoly schnikes these are awesome! My daughter loves peonies and is getting married in November. Maybe if we start now we can learn to make paper peonies for some fabulous decor. Or maybe I will wear one!
ReplyDeleteThanks, Teresa! Congratulations on your daughter's wedding, I dare you to wear one! :)
DeleteOh, my! These are SO gorgeous! I would never let anyone beat them with a stick, though. :)
ReplyDeleteWho am I kidding, me neither! ;)
DeleteAbsolutely Stunning! Thank you for sharing.
ReplyDeleteThank you, Darlene! :)
DeleteOh my gosh! STUNNING! I would totally take those off your hands :)
ReplyDeleteThank you, Vicky! I am selling them in my Etsy shop if you're interested. ;)
DeleteDo you think you this would work with just tissue paper rather than the crepe paper?? (They are BEAUTIFUL by the way!)
ReplyDeleteI do think you could do something lovely with tissue paper with these. Your cuts might not need to be so precise and I'm not sure if if would be less dangerous to use regular glue than hot glue, but sure. People make similar things all the time, I think!
DeleteHi there!! Your flowers are absolutely beautiful! I have attempted the open peony and it turned out great! My only question is which petal template did you use to fill in between #7. Also, would you mind sharing the closed peony tutorial?
ReplyDeleteHi Jamila! Thank you! I cannot wait to see your peony! Please send me a photo when you can.
DeleteSo, the petals I use to infill between the #7's are actually shown in the photo collage under "Step 7" above. They are thin with two "bumps" at the top and when they are stretched they look like a small version of the type 1 petals. If you are having trouble finding that, send me an email and I'll send the photo directly to you.
I would love to do the closed peony tutorial, but I don't have time right now. I am possibly making some for a bat mitzvah in Maine in a few weeks, so if I do I will create a tutorial as I work. But it will be a few weeks at least.
Can't wait to see your work!
Hello, thanking you for sharing your talent :-D I love peonies and definitely be making these to make a statement for my mums bday decor. Love love love. Gorgeously amazing. More please!!!!
ReplyDeleteThank you for your enthusiasm! Let me know if you make them, I'd love to see!
DeleteSpeechless! Looks like hard hard work..totally worth it. So beautiful!
ReplyDeleteThank you, Lilia! Yes, hard work, but I love that kind of stuff so fun for me. :)
DeleteTiffanie
ReplyDeleteThis blog post/tutorial is SO detailed. It must have taken you as long to write it, as it took to make the flowers.
Thank you for being so generous with your time.
.
The post is wonderful and the flowers are beyond stunning.
.
Although I am posting to Pinterest and to my own blog & FB, I can't imagine that when I have a go at making my own, that they will look anywhere near as glorious.
.
<3
Pia
Thank you for your nice comment, Pia! I am glad that I did a detailed tutorial, too, because I have to refer back to it every time I make one! :)
DeleteThese are simply amazing! They would be perfect for a wedding recpetion or any party! We would love to have you share this at
ReplyDeleteour Saturday Link Party. Each link will be shown on two blogs, Made From Pinterest and Bakerette! It starts Fridays at 3pm, hope we see you there!
Please remember to put a link back to Made From Pinterest at the bottom of your post(s).
Hi there,
DeleteThank you so much for your comment and invitation. If I don't get to it today I will try another time. :)
I love these so much! Peonies are such a lovely bloom. The only thing is I couldn't bare to hit it with a stick, it's much too pretty. Perfect wedding decor though! :)
ReplyDeleteI can't wait to try making these!
xo Maree - Rose Tinted Illustration
Thank you, Maree!
DeleteI totally love peonies! Since I find your blog I find myself looking at it over and over! I'm trying to make the pinata tonight but I don't know if I'll have enough paper to finish tonight. Too exciting! Thanks for the tutorial! How soon do you think that you will post the tutorial for the partially closed peony?
ReplyDeleteThank you, Edna! I would love to see your peonies when they are finished. I think I will have a tutorial for the partially closed one up in the next two weeks, I need to make a bunch of them right now for a commission, so I'll do the tutorial while I make them. :)
DeleteI just found this tutorial... I'm in love with your darling peonies!! they are truly a work of art... how long did it take to make one?
ReplyDeleteHello, Sister Ormsby. The bright fuschia "closed" peony took about four hours. The others about 12! I am working on some new ones and am going to track my time to see more accurately how long they take. Thank you for your complements! :)
DeleteOh my goodness, these are astoundingly pretty. And you are so generous to share how you make them! Thank you for your tutorial! These are so gorgeous. I hope to try my hand at one, or probably just get one from your etsy shop for my next party. What a talent!
ReplyDeleteThank you so much for your kind words, Marianne! If you do give it a shot, let me see how it turns out! :)
DeleteThese are so so so so pretty! love them soooooo much! You are so talented! Thank you so so much for this tutorial! I will be having a go at making one of these, I have the perfect spot where I can stare at it all day! he he : ) so pretty, thank you again.
ReplyDeleteKatie x
Thank you for your comment, Kate! Please, PLEASE let me know if you make one, I'd love to see it!
DeleteI am so inspired by your beautiful peony piñata. I have begun making one for my daughter Lemons 2nd birthday! Thank you for posting this tutorial. It's hard work and I've burned myself a few times. But def worth it. U r a master of your art!
ReplyDeleteYour girls are dolls
Hi Crystal,
DeleteThank you for your comment! (I have a girl and a boy with long hair, by the way.) I hope you haven't hurt yourself too badly! I would love to see photos of your peony when you finish. I saw your previous comment and sadly I have no idea how many petals it took. SO MANY. But I'm sure you figured that out by now! :)
I thought I was finished for my little girls birthday party....until I saw these.....wow! I can't wait to see if I will manage but I'll certainly try, they are gorgeous!!
ReplyDeleteThank you very much, Lisette, and good luck if you do try!
DeleteThanks so much for sharing this! Are you adding any petals in with the #8? My side view looks nothing like yours. Thanks for any help you can provide! I'm also looking forward to the closed peony tutorial. Do you still plan to post it?
ReplyDeleteHi Alyssa,
DeleteI'm so excited you are trying it. Do you want to send me a photo and I can take a look at what's different? My email is sfcornerblog at hotmail dot com. I really meant it in the instructions when I said glue the number 8 petals in willy-nilly, like a peony that is exploding and on it's way to bursting apart! If you pinch the bases of those petals a bit they will twist and turn more. I hope that helps!
You're a creative genius, this is the prettiest piñata I have ever seen. It's far too pretty to hit with a stick, don't you think? Hope you don't mind, I've featured this on one of my party blog posts of top 35 favourite diy piñatas. http://www.stylemyparty.co.uk/blog/35-pinata-tutorials-diy/
ReplyDeletetake a look it's sitting pretty! Stacy :)
Thank you for the compliments, Stacy, and for including me in that awesome list. A great resource for piñata ideas! :)
DeleteHi Tiffanie, first of all WOW! They look amazing and I can't wait to get in there and try one myself. Wondering how long it usually takes you to make one? Just to give ne a guide as to what I'm signing myself up to :). If you have more detailed images of each layer or the alike it would be most helpful :) (not that your tutorial isn't already).
ReplyDeleteHi there! They take a LONG, LONG time, like 20 hours. Ridiculous! I can't imagine taking more detailed photos than I did, but I do think some are lacking toward steps 7 and 8, so maybe I could email you photos while I'm making one (I have six commissions at the moment, so I am making a ton right now). Email me if you want some photos at some point over the next few weeks.
DeleteHi there, I would love to try my hand at the open peony... Do you have time to post that tutorial?
ReplyDeleteHi Sarah,
DeleteI am so sorry, but I am in the middle of crazytown holiday time trying to get my wares out to galleries in town and another online sale so I think it will be the new year before I get to it. I'm assuming you mean the closed peony, as the open peony tutorial is listed in this post. Thank you for your inquiry, and again, sorry I can't get to it right now. :/
No worries! I hope you find some time for recharging amongst all the craziness and thrills! I did mean the hot pink peony, so I will check back in the new year... And promise to send photos if I make it!
Delete:)
DeleteThese are gorgeous! I love them!!
ReplyDeleteThank you, Stacy! :)
DeleteWow! These are gorgeous and you are very generous to offer us a tutorial for making them.
ReplyDeleteI really REALLY love them!
Thank you so much for your sweet comment, Nini! :)
DeleteHi!! I am planning on making these for my wedding in May (the second layer of paper mache is already on!), but I'm having a really hard time finding crepe paper that won't break the bank at $7-$14 per roll. Where do you get your crepe paper?
ReplyDeleteHi Lexy! I only used three rolls or less on each one, so hopefully that is affordable for you. I get my crepe paper from the wonderful people at Carte Fini, and sometimes at Castle in the Air, too. Congratulations on your upcoming wedding!
DeleteSo...I would like to use your AMAZING idea to make a Peony out of steel. I 'm very skilled with steel but, I want to know if you think I should go with a steel bowl if it will have to be thicker than the petals (petals 24 gauge and bowl at least 20 gauge). Also is there anything else I should pay extra attention to when trying it in metal? I know it sounds crazy and metal isn't your medium but I'm hoping you might be able to help.
ReplyDeleteHi Mike. If this is a serious comment, then WOW! That would be awesome, and a steel bowl is a great idea. Another thing that would work is a steel dog dish, so it's got the recessed bowl part and then the walls going back down. If you welded that to the bottom of an upside down bowl you would have a metal base similar to the shape of my paper mache base. Good luck!
DeleteLove these--what a fun idea! I never would have thought of giant flowers as a pinata!
ReplyDeleteThank you! It was one of the few great ideas I've had in my lifetime! ;)
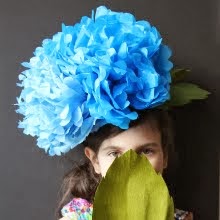
DeleteThank you for this wonderful tutorial! We just made 16 of these (and one rose) as "headpieces" for the youngest dancers in Chesapeake Ballet Company's spring production of "The Snow Queen". I would love to share the photos with you. The whole garden dancing was pretty amazing!
ReplyDeletePlease! Please send me photos, I would LOVE to see them. That is incredible and something I really hoped would happen. My email address is sfcornerblog at hotmail dot com. :)
DeleteWow what an amazing job! This is one of the coolest tissue paper floral projects I have come across.
ReplyDeleteThank you, Haley! Crepe paper, actually. :)
DeleteTiffanie - when I get married will you come make these for my wedding? STUNNING.
ReplyDeleteHa! I wish I could spend all of my time doing just that! :)
DeleteHi Tiffanie, would you mind sharing what colour crepe paper you have used to make these beautiful flowers? and any other pink shades you would recommend? I would love to make these for my wedding
ReplyDeleteHi Dani. Sure, no problem. The deep fuschia colored closed peony is Carte Fini color #570. The light pink one is an equal blend of very faint pink #569 with another slightly deeper light pink #548. The cream one is color #603. Those are the best peony colors they have, in my opinion. I tried a more coral one in color #601 but it didn't look as natural. I hope that helps. I am impressed with myself. I knew all of those numbers off of the top of my head! :)
DeleteWhat a beautiful project! You are so talented and generous to share your tutorial with everyone! I do have a question though - I've been trying to make a life-size version of your tutorial and am struggling with cutting the petals out cleanly. Do you have any advice for achieving that because your petals are just beautifully cut! I'm using crepe paper from Carte Fini. Thank you!!
ReplyDeleteHi Christina! Thank you, you are a doll. The trick is to not cut more than 2-4 layers of paper at a time. I don't own decent paper scissors by any stretch of the imagination, so I always limit it to four layers, max. Good luck! :)
DeleteHi Christina! I am BLOWN away by your pieces! They look AMAZING! I like how you used that raspberry-ish ombre paper, love that stuff! SO GOOD!
DeleteDid your friend use a Cricut machine? I've been thinking about looking into something like that.
Great work! :)
Hi Tiffanie, this project is so beautiful. I have questions, Do you close the back side of the piñata? How do you hang the piñata? You wrote "Flip it over and add fishing wire hangers embedded in thick lines of hot glue. Three evenly spaced hangers work great when tied together several inches above the opening" but I think if I do this the first person that hits the piñata will bring it down. Do you have any suggestions?
ReplyDeleteThank you for such a great project :)
Hi Rosa. Thanks for your nice note. I am now making these as fine art pieces, if you can believe that, and have switched over to installing grommet holes around the perimeter of the back, which makes for a sturdy place to weave the picture wire I hang them with. If you look through this listing you will see a photo of the grommet holes:
Deletehttps://www.etsy.com/transaction/156002183?
As far as the candy not falling out of the back, I think an extra piece of cardboard or still paper, well glued or taped around the top of the "bucket" of candy at the back of the piñata will keep the candy in while it's swinging when hit.
I hope that helps, and please send me photos when you're done! Thanks! Tiffanie